1. Using SharkBase
Before you can start running SharkBase, you should familiarize yourself with some basic topics. These are discussed in this section, beginning with “what is a database?” and continuing with getting SharkBase into operation, and using SharkBase without and with programs. This sections also covers installation of SharkBase on your computer, and customizing the installation to meet your specific needs.
Finally, some considerations for advanced users are discussed, and the several different versions of SharkBase are compared.
1.1. Basic Concepts and Orientation
There are some basic concepts and vocabulary that are fundamental to getting maximum results from using SharkBase. These are discussed here, including records and fields, file names and field names, your keyboard and the way we use and refer to its various keys.
The Shark Start-up Screen: When Shark first starts on your PC, it has very little content and displays a simple start-up screen:
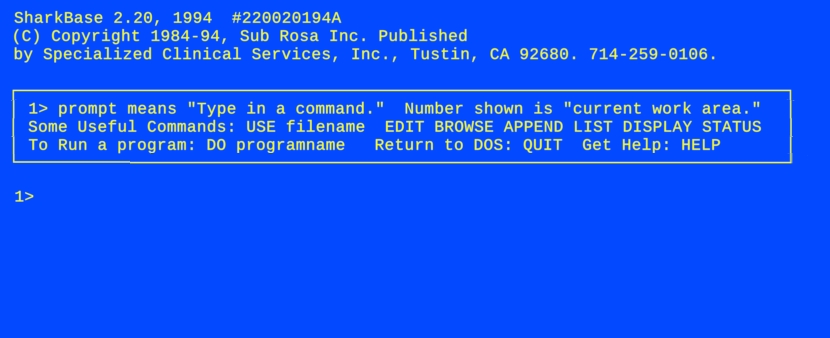
The objective is to fill Shark with useful data that works for you and makes you more efficient!
Records and Fields: Everybody keeps information in order using elementary tools. Here is a 3x5 card kept on an employee in a small company:
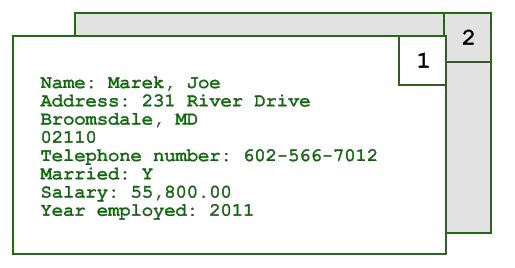
Now review some jargon: the electronic version of a file-card box (containing such cards) is called a data file; a card itself is called a record. The number in the upper-right corner of the card identifies the card as record number 1. All records are numbered by record number.
A card has separate areas for the various pieces of information you want to collect. We call these areas fields. Each field is identified by its name. In this example, for instance, “City” is a field name, while “Bloomsdale, MD” is the content of the field.
You identify records by their number, fields by their names. How do you identify data files? By their names, of course. For instance, all the cards of your employees could be sitting in a box labelled “Employees” Unfortunately, because of DOS-file limitations, the name you can give to a data file in your computer is rather restrictive: only 8 letters or numbers can be used. So EMPLOYEE will have to do; EMP1, EMP2 are also good file names. (Since both VP-Info and Shark have built-in compilers, do not use COMP for the first four letters of a data or index file name; this would create an obvious conflict. SharkBase is unable to open such a file.)
A file is actually identified by its drive designation, its directory, its file name, and its extension. For example, the full designation of our employee file could be C:\DBF\EMPLOYEE.DBF.
DBF files:. The DBF file type (for example "EMPLOYEE.DBF") is a standard, universal file type understood by almost all computer systems. Any dbf file created by SharkBase (or dBase, for that matter) can be read and used by many other languages such as Microsoft Excel, OpenOffice, and LibreOffice. There are old versions and new versions but, in general, they all work in any modern environment. The newest versions such as those created in SharkBase are bigger and faster than the early and can hold much more information than older dBase files. In one form or another, they're all readable by any standard spreadsheet, computer system, or server - and the basic DBF file type will never become outdated.
Although the DBF file is the most widely used standard data file type, there are many other file types used by SharkBase. The extension always reveals the type of the SharkBase file. Within Shark, most of the commands do not require that you append the extension. For instance, when you create a DATA file, the extension DBF is added automatically unless you provide another one specifically.
File names:. A file name can have at most 8 characters, plus a three-letter extension. You can use all the letters of the alphabet, the digits 0 to 9, and the underscore character (_). You can use both capital and lower-case letters, but the lower-case letters will be replaced by their upper-case version.
The restrictions on a file name are imposed by the operating system of your computer. (Check your Operating System Manual.) In this manual it is assumed that you have some familiarity with your computer and operating system. Specifically, you should know the drive designations, the operating system prompt, the DIR command, and how to move files from one drive to another.) Your DOS may allow you to use some other characters as well; however, you cannot go wrong following the rules as they were stated above.
Note that the blank (the character you get by pressing the spacebar), some punctuation symbols (. ,:) , and most special characters (< > | + and so on) are always prohibited. For instance, you are never allowed to use as a file name two short words separated by a blank, such as CAR NAME.
The data file we mentioned before, EMPLOYEE, also has an extension, “DBF”. When you type in the full name, the extension is separated from the file name by a period, though when you see it listed by DIR, the extension will be separated from the name by one or more spaces. The extension may have at most three characters; all SharkBase file extensions have exactly three letters.
When you use a data file in Shark, just give the file name (with or without the drive designation); pressing the Enter key adds the DBF extension. As a rule, when Shark asks for a file name, it's not necessary to give the extension.
It's not unusual that there may be a need to import data from a non-Shark source (for example, a PayPal sales report or an Excel spreadsheet). Such files may be received from your source as a "CSV" file (Comma Separated Value text file) or an "XLS" file, then read into a spreadsheet such as LibreOffice or Excel, and then exported or saved as a Shark DBF file to be further processed for a management report or a tax return. The reason for changing to a DBF file is simply speed. An invoice processed in Shark may take only milliseconds, whereas in a spreadsheet it might take several minutes. The Shark application can, at the same time, update all the accounts, sales tax, inventory, commissions, and so on!
Field names: A field name has at most 10 characters (two more than file names); you can use all the letters, the digits 0 to 9, the colon (:), and the underline (_). The first character must be a letter. Again, you can use lower-case letters, but Shark will convert them to upper case. Just as for file names, blanks cannot be used.
You have just read the formal rules for file and field names. The most important rule, however, is the following:
Always use file names and field names that are easy to remember, names that remind you of what is in the data file and field.
So "FILE1", as a rule, is not a good idea; "EMPLOYEE" is good. "NAME1" is good for first name (and so is "FNAME"); "FIELD2" is not a good idea.
How do you test whether a file or a field name is good by this rule? If you do not have to look up the file and field names when you use them, they were named well. If you have to look the names up all the time, use better names.
In setting up the data file (our electronic 3x5 cards), we first choose a name for it: EMPLOYEE. Next we choose the field names.
For the name (Marek, Joe), NAME is fine, but hard to handle. Later, we may need reports in which the first name and the family name are displayed differently. So we split up the name into two fields: NAME for the family name and FNAME for the first name.
The address is in three lines. Since you cannot put three lines in a field (and also to gain flexibility in reporting), we split the address up into four fields: ADDR, CITY, STATE, and ZIP.
Telephone number becomes TEL:NO; married can stay MARRIED; Salary can stay SALARY; Department is too long, so use DEPT instead. Finally, we shorten Year employed to YEAR:EMP. (Note that “z” or “_” is used in place of the blank, which is not allowed.)
The fields NAME, FNAME, ADDR, CITY, STATE, ZIP, TEL:NO, DEPT will be filled with text; anything that can be typed can go into these fields. You tell this to {‘} by saying that the field type is character, or the field is a character field. The abbreviation for character type is C.
It is not enough to say that NAME is a character field; {‘} also wants to know how many characters you want to allow in the field. This number is called the width of the field. For instance, if we specify 15, that means that any text of up to 15 characters can be typed into NAME. Shark will fill what is left of the field with blanks.
It is not always easy to decide the width of a field. What is the longest family name we’ll have to use? Don’t worry, you can always make changes later.
In this example, we use the CREATE command (see Section 4.3), and enter the following: "CREATE employee":
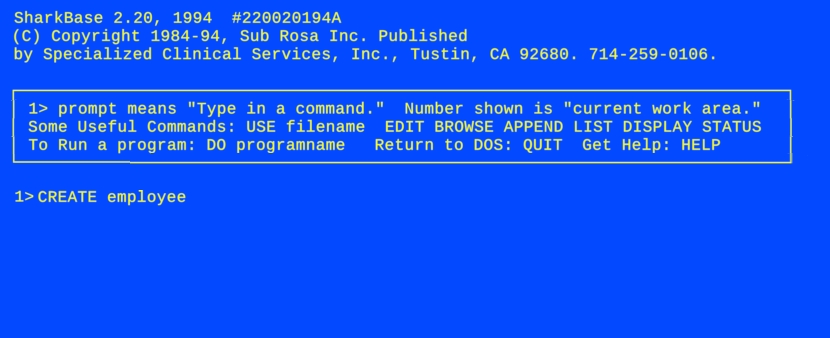
This starts a fresh file in which ALL the employees will have a separate RECORD within the larger data file namedEMPLOYEE.DBF.
Field Types:. SALARY and YEAR:EMP are numbers. Of course, we could define them as character fields, but then we could not do mathematical operations on them. Since they are, by their nature, numbers, it is more natural to define them as such, so we define them as numeric fields, type N.
The width of YEAR:EMP is 4; you also have to tell how many digits are allowed after the decimal point; in this case there is no decimal point, so we say 0.
The width of SALARY should be 9 to take salaries over $100,000.00. When counting for the width, we count all the digits and the decimal point. You are not allowed to type in 120000.00 as 120,000.00, so we do not make room for the comma; the width of SALARY is 9, with 2 decimals.

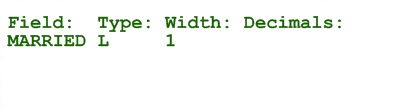
Finally, there is the field MARRIED. You could define it as a character field of width 1. If you do this, the field will accept any single character for MARRIED. You can restrict the characters accepted to “Y” (yes), “N” (no) by declaring MARRIED to be a logical field (L). In fact, you can use any of “Y”, “y”, “T”, or “t” for true, and any of “N”, “n”, “F”, or “f” for false.
A logical field is always of width 1.
The Keyboard:: The next step is to create the EMPLOYEE data file. But before you do that, familiarize yourself with your keyboard (yours may have more keys than this representation of the original standard IBM PC keyboard, but all these keys are on your keyboard, and these are the only ones you need for SharkBase):
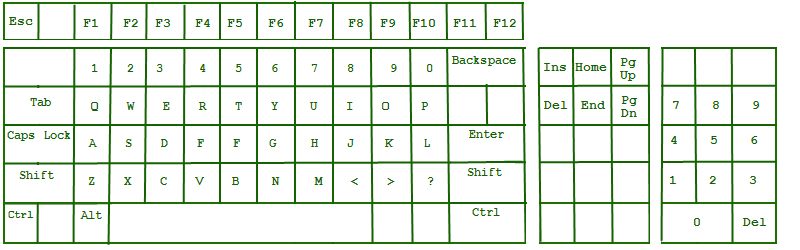
There are a few special keys you have to know. <Enter> refers to the key usually called ENTER or RETURN, marked on some computers with a hooked backarrow: ↵. Some keyboards have both a RETURN and an ENTER key; they are interchangeable.
At the right is a set of keys called the numeric keypad and/or the cursor keypad. With the <Num Lock> key switched on or with the <Shift> key depressed, these keys output numbers; otherwise they control the cursor (the flashing rectangle that indicates where the next character we press will appear on the screen) and other actions.
The key <End> is used to indicate the end of a SharkBase procedure, such as APPEND, BROWSE, CREATE, EDIT, WRITE. Pressing <End> returns the user to the previous menu or task.
The four arrow keys are referred to as <Up>, <Dn>, <Left> and <Right>, which we will write as ↑, ↓, ←, and →. They are used to move the cursor around the screen.
The keys <Home>, <PgUp>, and <PgDn> are used for some commands, such as EDIT, BROWSE, READ, and WRITE.
The left arrow on your cursor pad, "←", should not be confused with the "Backspace" at the top of the keyboard. "←" moves the cursor to the left without affecting the characters under it, but <Backspace> “swallows up” characters as it moves left.
The delete key <Del>, and the insert key <Ins>, are used to delete and insert characters on the command line and during data entry and editing. Each time <Del> is pressed, one character is removed at the cursor, and anything to the right moves over to take its place. The <Ins> key is a “toggle,” meaning that if insert mode is on, pressing <Ins> turns it off, and vice-versa.
Your keyboard also has ten or more function keys at the left or along the top; the ten marked <F1 > to <F10> have pre-assigned roles which can be changed by the user either at start-up, or within a program. See FUNCTION in the Set Environment section. Function keys <F1 > to <F10> are fully functional in vDOS and can be repurposed easily by editing the SHARKNET.CNF file or directly including a new setting (viz: :F3="dir;") in any regular program for a temporary change. See Shark Tools - The Configuration File"
The escape key, <Esc>, can be used to escape from a command. Sometime two keys have to be pressed at the some time. Ctrl-W means press the control key (marked as Ctrl) and the W key at the same time (there is no harm done pressing the control key first). "Alt-F10" means press the <Alt> key and <F1O> at the same time.
1.2. Setting up SharkBase
To run SharkBase on vDOS, you need a Windows PC, and any version of Windows. Shark will also run on any older MS-DOS/DR-DOS computer with at least 512K memory. The Network Edition requires MS-DOS 3.1 or later. SharkBase is also compatible with all versions of DR DOS beginning with Version 5.0. Everything you need to run Shark is in the vDOS executable file.
1. The earlier versions, for example VP-Info will have the file name VPI.EXE and are somewhat, but not entirely, compatible with SharkBase 2! It's recommended that the two versions should not be run on the same computer. There is no logical reason to do this since although SharkBase can run all previous versions, the reverse is not true.
2. All versions of the latest SharkBase have the name SHARK~
3. All those for SharkBase Network Edition also have the name SHARK, except that those with the following extensions have the name SHARKN: CNF, SET and SCN.
4. If you want to run both SharkBase Single- User Edition and SharkBase Network Edition on the same computer, we recommend you rename SHARK.EXE to SHARKN.EXE, as discussed in detail in Section 1.7.
The extensions for these files are as follows:
1. The EXE file and the MSG file. Each version of SharkBase has its own set of matching executable and message files, both of which must be in the same place, either in the current directory or in any directory on the DOS PATH (see your DOS manual for details on PATH). SharkBase cannot be run without both of these files.
In addition, both files are internally matched, so that an EXE of one version or date of issue cannot be run without the MSG file generated for that version on the same day.
To avoid errors, there should not be more than one copy of each of these files anywhere in your drive, and there should be no copies of VP-Info running on your system at the same time.
The SHARK.EXE file may be renamed if you desire, (e.g. when running on a Windows network) but the SHARK.MSG and all the following files must retain both their name and extension.
2. The SCN file generated buy SCODE.COM: A file that must reside in the directory where SharkBase is executed. The SCN file is used by the STUFF command to translate the user’s commands into scan codes that are transferred (to a program run with the ROLL command) through the keyboard buffer.
3. The "HLP" file. SharkBase has an excellent on-line help system that can be run at any time you are in conversational (interactive) mode. It is optional. To run it, the HLP file must be in the same directory as the MSG file. If it is not present, the HELP command does not work. The HLP and MSG files can reside in the same folder as the main Shark files. The Shark files that you're reading here can also be kept open in a separate window while you're working on Shark applications development.
4. The CNF file. An optional configuration file generated by the user. This is a regular SharkBase program file (uncompiled), residing in the directory where SharkBase is executed. It is typically used to invoke the SET flags to suit your needs, to define the function keys and such system variables as :COMPANY and :TITLE, and to establish where SharkBase can expect to find files outside the current folders (FILES . . . ENDFILES).
5. The SET file. An optional memory management file for MS-DOS users that, if used, must reside in the directory where SharkBase is executed. The SET file is discussed in detail in Section 1.6.
6. The SGN file. An optional file supplied with the system, providing an attractive but S-L-O-W sign-on for the user each time SharkBase is executed. This "feature", to be honest, is not very useful, and can be left out. The SGN file normally goes in the same directory as the MSG file, but if you want it to be executed only in some directories and not in others, you will have to put it in each directory from which you want it executed, and make sure it is not in any directory listed in the DOS PATH. Otherwise all your networked terminals will be beeping simultaneously (very annoying!).
In addition, when running Shark on an MS-DOS computer, not on vDOS, you must have a CONFIG.SYS file (in the root directory of your boot disk, see your DOS Reference Manual) containing the lines:
FILES=50
BUFFERS=20
If you are running SharkBase under MS-DOS 3.3 or above, you may open as many as 65 files at the same time, provided the FILES= command in both your CONFIG.SYS and the SET file is set at least that high. The maximum number of files for DOS versions below 3.3 is 20.
NOTE: a CONFIG.SYS file is not required when running Shark on a Windows emulator such as DOSbox-X or vDOS. The host O/S running vDOS, most likely Windows, handles the file management and memory tasks. The vDOS emulator on Windows, for example, provides ~15MB XMS and ~16MB EMS. For DOS programs that’s a lot of elbow room.
The Installation Process on an MS-DOS computer: All versions of SharkBase come with an automated MS-DOS installation program which can be ignored when using a DOS emulator. In this case, under Windows for example, just create a folder, c:\SHARK for example, and copy the EXE, MSG, CNF and HLP files to that folder. You can run Shark with this setup, but it will become messy since all your work will be jumbled together in that single folder. To keep your affairs orderly, create adjacent folders for the different working data files organized thus:
C:\SHARK
C:\PRG
C:\CPL
C:\NDX
C:\TXT
If you make a corrsponding SHARKNET.CNF file in your C:\SHARK folder thus:
FILES
*.PRG,C:\PRG\
*.CPL,C:\CPL\
*.NDX,C:\NDX\
*.TXT,C:\TXT\
ENDFILES
Shark will then automatically keep your work organized. Shark will, for example, save all files with a "PRG" extension in the folder C:\PRG. This is just a simple example. Study the Configuration section for more ideas. This simple technique makes it easy to find your work and data!
A separate file is provided called README, which details the installation procedure. In brief, the installation does the following:
1. SharkBase’s EXE, MSG, SGN and HLP files are placed in a single directory on the DOS path, which is used by the operating system to find programs which you want to run. In most cases, your drive (such as "C:/") will have separate folders in which all the DOS files are kept, and others in which common utilities and programs are kept. In a DOS computer, the path is normally set in a file called AUTOEXEC.BAT (which must be in the root directory of the C: drive on all hard-disk computers) with a PATH command. A typical MS-DOS PATH command might be:
PATH c:\dos ;c:\uti1; c:\norton; c:\pctoo1s
NOTE: With vDOS in Windows, this isn't necessary! Just load everything into a C:/SHARK folder and create the needed sub-folders for TXT, DBF, PRG, NDX (and more if needed) that SHARK uses when put to work.
2. We suggest that your own SharkBase files be placed in a separate directory which is not on the root, such as C:/SHARK. This is created by the DOS "MD" command or by Windows "New Folder" when using an emulator.
3. The distribution disks also contain two special groupings of files which should be kept together in their own directories. The installation program creates them as follows:
1>MD c:\shark\samples MD c:\shark\charity
In Windows, you can do the same setup, or you might like to put all samples and demos in a "DEMOS" folder.
These become the home for the contents of SAMPLES.EXE and SAMPLES2.EXE, which are both self-extracting archives containing a number of files of various types. They provide a variety of sample programs and their supporting files, along with special programs called either DEMOS.PRG or SAMPLES.PRG which run various demonstration programs. The next section of this Guide entitled “Starting Fast” uses these files in a quick, easy, hands-on introduction to SharkBase.
They also contain a complete application, fully described in the Programming Example section later in this User’s Guide.
4. All files not specifically mentioned above should be copied into the main SharkBase directory.
1.3. Conversational SharkBase
After you start SharkBase, you see the copyright notice, and the SharkBase prompt:
1>
This prompt is SharkBase’s way of asking: “What now?” You can issue any commands (as listed in the Reference Guide), run a program of your choice, or you can write and run a SharkBase "START" program. At start-up, Shark will automatically run any program named START.PRG (or SHARK.CPL) which it finds in your SHARK folder.
Conversational SharkBase (also called interactive mode) is the use of SharkBase by directly entering commands instead of using programs. (You may find it easier to follow this section if you jump ahead to the next section of this Guide, called "Learning the Basics". This section contains suggestions on how to get into your SharkBase quickly and easily.)
SharkBase has a number of features to help you along. There are a few hints to help you get into SharkBase quickly.
Type in a command (for example,"DIR"); pressing <Enter> executes the command:
l>DIR
The command line can be fully edited. Use the cursor keys described in the keyboard section above, or the full list of editing keys listed under the WRITE command in Section 4.3.
If there is an error in the command, the command line is redisplayed; the cursor is placed on the first word after the word that is the likely cause of the trouble. Use the editing keys to change the command line; then press <Enter> to try executing it again.
There are 78 characters on the command line available for a command. If you type in a longer command line, these 78 characters will act as a window, with some characters disappearing off the left or right edge of the screen. You always see 78 characters of the long command line.
SharkBase stores away the last five command lines (up to several hundred characters for the five commands combined). You can get the previous command line back by pressing ↑, the "Up Arrow" key. (If the retrieved command is longer than the screen can display at one time, you will see only a blank line; press Ctrl-< —> > followed by Crtl-< <— > to make it scroll horizontaly into editing position.) If you press the ↑ key twice, you get back the second last command line, and so on. You can execute the recalled command by pressing <Enter>; you can edit the command before executing it just as though you had typed it yourself.
The most important commands for a beginner becoming familiar with SharkBase are:
CREATE - create a new DBF data file
MODIFY - change the structure on an existing DBF data file
APPEND - add records to a DBF data file
EDIT - view and change fields in a DBF data file
BROWSE - view and change some fields in many records of a DBF data file
LOCATE FOR - goto a record that meets some condition
CONTINUE - goto the next record that meets the same condition
LIST - list the fields of all or some records in a DBF data file
DISPLAY - list the fields in the current record of a data file
COUNT - count the records in a data file
SUM - add up the values of a numeric field in a data file
SORT - sort a data file into a new file with a new order
INDEX - create a separate file that maintains the apparent order of a data file without sorting the file
FIND - find a record in an indexed file by the value of its “key”
REPORT - produce a formatted list of a data file with optional headings, subtotals, and totals
STATUS - check what files are open, the setting of SET commands, and the value of memory variables
LIST STRU - check the structure of the current data file
WRITE - create or edit a text file or PRG program file. You can also use Windows "Notepad"or a programmer's editing application like "Notepad++". Don't use word-processing applications (like MS Word for example) to create program files!
The tutorials on Conversational SharkBase and programming in this volume, and the alphabetical command reference in the Reference Guide, explain use of these commands and many of the interactive features in greater detail.
1.4. Running Programs with SharkBase
When you see the MS-DOS operating system prompt (C> for example), you can load Shark by typing:
C>SHARK
You can also save your starting program (for example "SHARK START") as a Windows vDOS desktop icon. vDOS will then start Shark and run your START.PRG program. From now on, all you have to do in Windows is click on the icon just like any other normal Windows application.
You can then run your program ("MENU.PRG" for example) by typing "DO MENU". Or you can include "SHARK MENU" as a line in the vDOS autoexec.txt file. SharkBase will load itself into memory, read the CNF file if found, and then run MENU.
When running Shark with a Windows emulator, the emulator will load Shark for you and you will see the Shark user area prompt:
1>
As in the DOS sequence above, type "DO MENU", and SharkBase will load itself into memory, read the CNF file if found, and then run the MENU demo program. The demo programs can be edited as you like, and even re-purposed into useful applications. When experimenting, it's a good idea to keep the original as a backup in case you make a mess of the demo program!
In either instance, from within SharkBase, that is, when you see the SharkBase 1> prompt (or 2>,...,10>), you will run a program via the DO command:
l>DO MENU
In either case, SharkBase will first look for a compiled program: MENU.CPL; if it is found, SharkBase will run it. If there is no MENU.CPL, SharkBase will look for an uncompiled program, MENU.PRG, which it will compile on-the-fly and immediately execute. The program name need not have an extension in the command line.
There are three other types of program which can be run by SharkBase: standard EXE and COM programs with the ROLL command; standard EXE, COM, and BAT programs with the RUN command; and binary file (assembly language) programs with the CALL command. See the commands ROLL, RUN and CALL.
1.5. Compiling with SharkBase
There are two ways to compile a program. The first is on the command line itself:
l>COMPILE menu
This is the same as typing "COMPILE menu.prg" and will create the fast, compiled version of your program MENU.PRG which will be saved as "MENU.CPL". Alternately, you can compile many programs in one step by creating and running a program containing a batch of COMPILE commands. For example, PROJECT.PRG may consist of the following commands:
COMPILE progl
COMPILE prog2
COMPILE prog3
etc
Thus you can CHAIN your collection of PRGs each time you want to run the complete program, which will assemble and compile the run-time version each time, OR you can compile the program once when ready, and Shark keeps the compiled version which runs instantly each time you want to re-run the task. There are now two ways to run your program, and both run the same: "CHAIN PROG1" will run the faster CPL if Shark finds it, or it will compile and run the PRG if it doesn't see the CPL file. Thus:
DO PROJECT
will re-compile PROG1.PRG, PROG2.PRG, and PROG3.PRG into "PROJECT.CPL" each time and immediately execute PROG1.CPL (the first of your programs in the series) (The command "DO" issued at the command line is equivalent to CHAIN; inside a program, the "DO" command can activate other sub-routines as well as complete programs).
1.6. The Configuration and Setting Files
When SharkBase is invoked, it first looks for some special files that are used to customize its installation to meet the user’s special needs.
The SET file. SharkBase allows a settings file with the extension SET, used by SharkBase primarily to permit the MS-DOS user to:
1. Set the maximum amount of memory to be used by SharkBase (MEMORY=)
2. Set the maximum amount of memory to be allocated for loading binary files (assembly-language routines) that can be executed from within SharkBase (BINSPACE=)
3. Set the maximum number of files that can be opened at one time by SharkBase (FILES=)
4. Set the maximum number of fields there can be in all data files opened at any one time (FIELDS =)
5. Suppress special screen and sound effects accessed through the SCREEN and SOUND commands (NOEFFECTS)
A modern Windows emulator (vDOS for example) handles the memory issues in 1,2,3,4 above. DOS memory management is ignored by modern emulators like vDOS and DOSbox-X since they use Windows memory management instead. However, users may wish to suppress the special sound effects with the NOEFFECTS command if, for example, there are many work-stations nearby emitting loud sound effects. Sound effects are optional and can be pruned or avoided easily.
SharkBase allows a configuration file with the extension CNF. The CNF file is a regular SharkBase program file (uncompiled), residing in the folder where SharkBase is executed.
The CNF file is completely optional, but it is extremely useful to define the SET flags to suit your needs, to define the function keys and such system variables as :COMPANY and :TITLE (see Section 2.6), and to establish where SharkBase can expect to find files outside the current directories (see FILES ENDFILES structure).
Any command can be used in the CNF file and it is compiled anew for each session every time you start SharkBase. If you don't like the result, you can simply edit it and start Shark again.
Note that if the last line of the file is a CHAIN command, the program CHAINED to will be executed, even if the DOS command that started SharkBase names another program (see Section 1.4).
1.7. Some Cautions For Advanced Users!
Let's be clear! There is no known reason to run different versions of dBase/VP-Info/Shark on the same computer! If you're upgrading from an earlier version, or from dBase, simply replace the dBase/VP-Info/Shark files with the later version and re-index all your files. However, with that said, and you have some reason to keep both applications, let's examine the reasons behind these cautions:
Trying to have different versions of SharkBase and VP-Info coexist with one another. There are actually several different situations, all of which have to be discussed separately:
1. Running two or more of the following — SharkBase, SharkBase Network Edition, dBase, or VP-Info on the same computer:
a. If no two versions access the same data or programs, there is no problem. Just load all of the appropriate files into the proper directories as shown in Section 1.2
b. If no network is involved, and the same programs are to be executed by two or more different versions of the above, it is only necessary to provide a different directory for each version’s CPL files, and use the FILES ENDFILES structure in each version’s CNF file to direct SharkBase to the correct set of compiled programs. Indexes for all versions create NDX files; all can reside in the same directory, but it is usually expeditious to separate them if they're managing different projects.
If programs for the different versions are not limited to the commands and functions available to the lowest-power version, separate directories for the programs may also be necessary to avoid "accidents".
c. There is no safe way to allow single-user versions to operate in a network enviromnent; do not try it except in a completely private directory, and do not access any files of any type which may also be accessed by SharkBase Network Edition (SHARKNET.EXE)
2. Running VP-Info together with one or more of the following — SharkBase, dBase, or VP-Info Professional — on the same computer:
a. The only files compatible between Version 1 VP-Info and the current versions of SharkBase are text files and libraries, report form files, and data files. All other files must be segregated into separate directories for each version if they are to be shared by the two versions. If you stick with the latest version of SharkBase, you will avoid any problems of this type.
b. Running Version 1 and VP-Info Professional is more difficult than other combinations, since the main file name is the same in both cases, VPI.EXE, and both look for VPI.CNF. Therefore, these two versions must be started in separate directories, and access to the shared files coordinated through the FILES-ENDFILES structures in their respective CNF files.
3. dBase, VP-Info and the SHARKNET version of SharkBase are incompatible together, and can cause catastrophic failure and data corruption if an attempt is made to share data files between them. There is no real reason to be using older versions of VP-Info or dBase on the same computer with new network-capable versions SharkBase, so it's best to avoid doing so! Each version is bug-free and stable, but they ought not to be mixed on the same computer.
To sum up: there is no reason to mix versions of dBase/VP-Info/Shark on the same computer. SharkBase has a similar syntax and many updated featuress such as printer tools. Our recommendation is to use the latest multi-user/multi-tasking version of SharkBase (SHARKNET.EXE) on a modern emulator for all your projects (single or multi-user) since it's easily the fastest and most stable version and can read/write everything produced in VP-Info or dBase.