SHARK TUTORIALS: Step-by-Step
Shark Tutorials
Topic 1: Conversational SharkBase
Most computer languages require programs to be written to accomplish almost anything. SharkBase, however, has the ability to accomplish a great deal even without programming. This section introduces you to the way data files are created and modified, how data is added and edited in data files, how data is sorted and indexed, and how it is listed, summarized, posted and updated — all without programming. Naturally, many of these techniques are also important in programming, which is discussed in the next section.
CHAPTER 1. THE BASIC COMMANDS
The essence of a database language, naturally enough, is the storage and manipulation of data. Most of the basic database operations can be
accomplished with a small number of simple commands which are introduced in this chapter.
1.1. Creating a Data File: The Command CREATE
Now that you have a little background, you are ready to create your first data file in SharkBase. Shark on today's PCs is run within a Windows emulator which provides all the required Windows tools to connect to the outside world. vDOS is one of several useful emulators, all of which can be installed simply by copying the executable (vdos.exe) into its own directory, plus its two startup files, autoexec.txt and config.txt. You may need to read both through to extract the main startup settings. After setting up, it's just a matter of clicking on the vDOS.exe, and SharkBase will be running on your Windows in less than a second! SharkBase starts up, displays its name, clears the screen, and shows the SharkBase prompt:
1>
As an aside, it should be pointed out that vDOS on Windows bypasses all the background operations used in older environments. vDOS simply activates Windows and starts SharkBase, and then you are off and running with no other contact with the operating system. The free emulators vDOS and DOSbox-X are updated and released annually, but there's no problem running older versions.
Now you're set to do some work. Whenever the SharkBase prompt "1>" is displayed, you can type a SharkBase command. To make it easy for you to follow what is happening, Shark always shows the complete conversation between the computer and the user, displayed like this:
SharkBase 2.20, 1994  #220020194A
(C) Copyright 1984-94, Sub Rosa Inc. Published
by Specialized Clinical Services, Inc., Tustin, CA 92680, USA

1>
The SharkBase prompt is where you communicate with Shark. Shark is saying,"Talk to me!" All SharkBase keywords — that is, the words in SharkBase's vocabulary — will be capitalized for easy reading. You can enter these words in upper- or lower-case. The SharkBase prompt is your only link to SharkBase when running in a Windows environment. The SharkBase prompt can be numbered from 1 to 10 (e.g. from "1>" to "10>") depending on how many data files you are working with at this moment. You talk to SharkBase with English-like commands. When you see the prompt, you know that Shark is listening to you for instructions. The first command you learn is CREATE. This command creates a SharkBase data file. CREATE is a rather special command; it initiates a rather long conversation. It keeps on prompting you to type in field names and specifications for later receiving data. This is how it starts:
1>CREATE
SHARK will reply:
1>CREATE
40. CREATE must be followed by a file name.
Notice that the name of the data file to be created is part of the command. SharkBase responds by waiting for your new file name. You decide to create a file of your employees:
1>CREATE employee
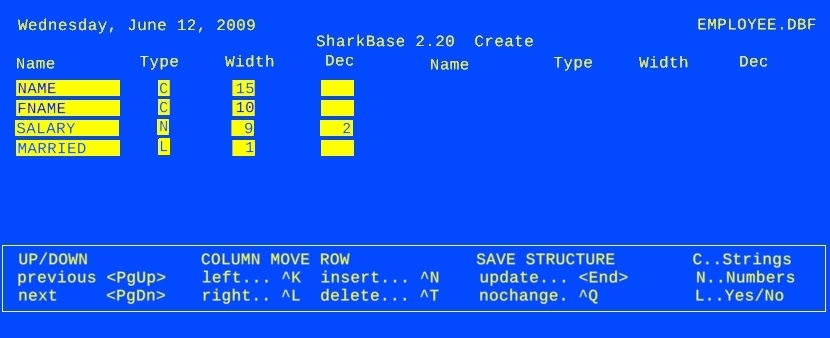
Shark accepts the challenge and responds with this display:
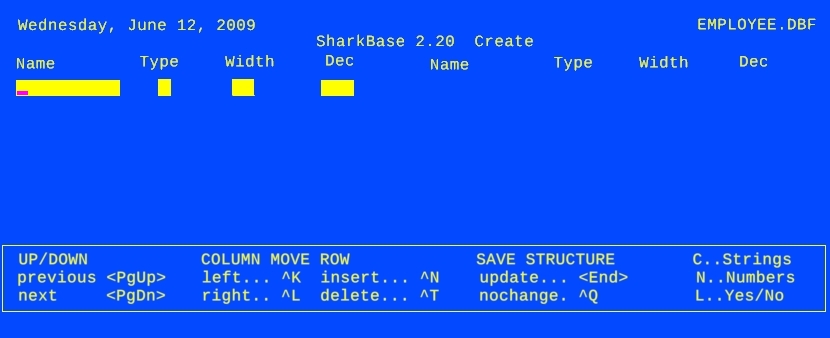
A flashing underline character shows the position of the cursor: what you type in will be entered at this point. There are four editing windows shown on the line: the first for the field name, the second for the type, the third for the width, and the last for the decimals.
Type "NAME" for the name of the first field:
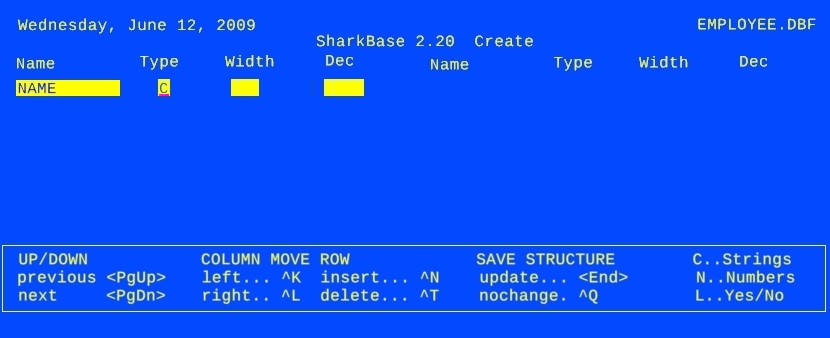
You are finished with the first editing window. To get to the second, press <Enter> - Next type C (for character type); note that the cursor jumps to the beginning of the third editing window (WIDTH):
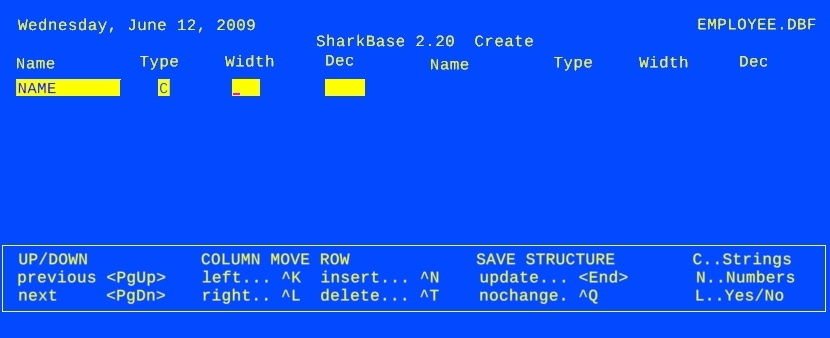
Type 15 and press <Enter> . Since character-type fields have no decimal points, the cursor jumps over the fourth input window (number of digits after the decimal point in a number) and you're ready to enter Field 2.
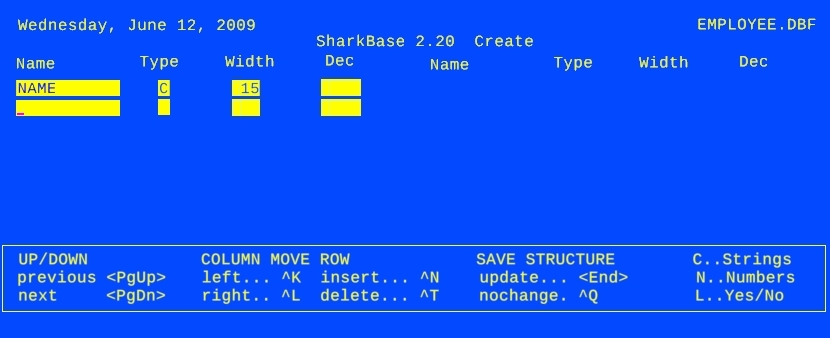
The editing windows of each additional field appear in turn and you can carry on typing. . .
When you complete entry of the structure and press the Press <End> key, you will be asked what data file format to use; the default is 0. 0 is the latest, most capable format, and 3 is the most flexible format. However, your preferred format can also depend on the DBF type of other applications you may need to work with such as VP-Info, Excel, OpenOffice, dBase, FoxPro, Clipper, etc. You can change from one type to another at any time, although changing from a newer format to an older one may not always be successful! With that caution, there is no problem with experimenting until you settle on a preferred database type.
You can save this file as Type 0, 1, 2 or 3 ... 3
Press <Enter> to accept type 3, or press 0, 1 or 2 to choose a different type. The data file is created, and the SharkBase 1> prompt appears for your next command. As you see, SharkBase supports four different data file formats, called Type 0, 1, 2 and 3. Types 1 and 2 can now be considered obsolete, since they are limited to about 65,000 records. Type 1 is the original VP-Info file format, and type 2 the original dBASE II file format. Both are used when importing/upgrading from older applications. Type 3 should be used when you need to access the data through other databases, spreadsheet and word-processing products such as Excel or OpenOffice. The unique SharkBase Type 0 file used in statistics-type applications (up to 4 billion records) cannot be accessed by anything except SharkBase. The default type is Type 3. Without prompting, Shark will save your work in the Type 3 format. Give the command QUIT to finish the SharkBase session. After the Shark prompt "1>" type "DIR" to see if you can find the data file EMPLOYEE. Indeed, in the directory listing you find the file listed as EMPLOYEE.DBF.
At this point, you can now input all the details of your employees as requested by your accounting department. You can now LIST your employees, or FIND a particular employee, or EDIT details of an employee.
1.2. Nobody Is Perfect: Correcting Errors?
The above conversation was perfect; not only did you work out beforehand all the field names, types, and widths, but you typed it all in without a mistake. What happens if you make an error?
Luckily, SharkBase shows you the editing keys to correct any errors you may have made (and even shows you the most important ones in a box on your screen when you are in such commands as CREATE, MODIFY, EDIT, BROWSE, etc.).
Editing the command line. Type in a command at the Shark prompt "1>"; pressing "Enter"executes the command.
If you notice a typing error on the command line, you can move the cursor back with the "<" key, make the correction, then move forward with the ">" key.
What you overtype the existing text, you are in overtype mode. Sometimes, for corrections, you may want to get into insert mode; you do that by pressing the "Ins key. Once in insert mode, pressing "Ins" again puts you back into overtype mode. Whenever you are in insert mode, you will see the cursor shape change, from a flashing underline to a flashing box.
"Ins" is a toggle switch; pressing it twice cancels the effect. There are many other toggle switches, including "Caps Lock" and "Num Lock" .
If there is an error in the command line and you press "Enter" , SharkBase sends you an error message and redisplays the command line so you can edit it.
You may also find the "Backspace" key useful to delete the character to the left of the cursor, and the "Del" key to delete the character at the cursor.
While "Enter" executes the command (wherever the cursor is on the command line), "Esc" escapes from the command without executing it.
Full-screen editing. The way CREATE displays the data on the screen provides your first example of full-screen editing. Full-screen editing is one of the most important features of SharkBase.
In full-screen editing, some parts of the screen are designated as editing windows. (The editing windows are displayed in reverse video. The SET DELIMITER ON command sets off the editing windows in a pair of colons.) You type data into editing windows. You can correct data in an editing window. You can freely move back and forth between editing windows. The special keystrokes that do these functions are called editing keys.
Correcting in an editing window. The CREATE command displays four editing windows for each field of the data file to be created. Within one editing window you can make corrections in exactly the same way as you correct command lines. In fact, you can think of a command line as a one-line editing window.
Therefore, to correct in an editing window:
          <(->                      move the cursor back one character
          <-)>                      move the cursor forward one character
          <Ins>                    get into insert mode: what you type gets inserted
                                       (normally, you are in overtype mode: what you type
                                       overtypes the existing text); pressing <Ins>
                                       again, puts you back into overtype mode
           <Backspace>         delete the character to the left of the cursor.
           <Del>                   delete the character on the cursor
           <Enter>                accept the current contents of the window and jump the
                                       cursor to the beginning of the next editing window
Moving from editing window to editing window. What if you notice an error in an editing window other than the one the cursor is currently in?
           <t>                      move the cursor to the previous editing window
           <1>                     move the cursor to the next editing window
           <PgUp>                move the cursor up one line
           <PgDn>                move the cursor down one line
           Ctrl-K                  move the cursor to the previous column (if there are  more than 12 fields)
           Ctrl-L                  move the cursor to the next column (if there are more  than 12 fields)
The last two are used when creating a data file with more than 12 fields. Each column on the screen displays only 12 fields. Use Ctrl-K and Ctrl-L to move between the columns. Finally, <End> finish the CREATE conversation
There is a lot more to CREATE than these editing keys. For instance, if you want to move the cursor from one line to the next (or previous), SharkBase will not let you do this unless the line you are on is error free. If SharkBase notices an error, a message is displayed, and you cannot leave the line until the error is corrected.
If you get confused, or just change your mind, and want to exit without saving the structure, pres <Esc>.
1.3. In Case You Forgot: The Command LIST STRUCTURE
By now you know that you do not just sit down and create a data file. You should work out the file name, field names, and field specifications before you type CREATE. But what if you have already created your data file? Can you check if everything is correct? Can SharkBase tell you the field specifications in case you have forgotten? Of course; use the command LIST STRUCTURE. Here is how:
           1>USE employee
           1>LIST STRUCTURE
           Data file:        EMPLOYEE.DBF
           Number of records:    6
           Filenumber:       #1
           Field  Name       Type  Width  Dec
            1     NAME           C       15
            2     FNAME         C       10
            3     ADDR           C       20
            4     CITY            C       20
            5     STATE          C        2
            6     ZIP             C        5
            7     TEL:NO        C        8
            8     MARRIED     L        1
            9     SALARY       N        9    2
           10     YEAR:EMP  N        4
            11    DEPT          C       15
           ** Record Length **       110
           1>
The first line of the structure report:
Data file: EMPLOYEE.DBF
shows the data file name (EMPLOYEE), and the extension (DBF). The second line gives the information about the number of records in the data file. (At this point, you may have 0.) The third line informs you that this is file 1. (The use of more than one data file is taken up later.)
If you want a printed record, use the command SET PRINT ON before LIST STRUCTURE. Turn the printing off with the command SET PRINT OFF.
Did you check the addition and get 109 for the total? Yes, that is correct. However, SharkBase adds one to this total to account for the deleted record flag (see Section 3.4).
To tell SharkBase to use a data file, the command (you guessed it) is USE:
1>USE employee
will open the data file EMPLOYEE for your use.
1.4. Adding Records to a Data File: The Command
APPEND
Add records to a data file in use with the command APPEND. The EMPLOYEE data file is currently empty, so APPEND will add records from 1 on. If the data file already has records, APPEND will add records from the last one on.
Here is how to add the first record to the EMPLOYEE data file:
           1>USE employee
           1>APPEND
This opens the EMPLOYEE data file (presently empty), and invokes the APPEND command. The screen is now erased and a new screen appears:

The display shows the file you are appending to (EMPLOYEE). The command shown is APPEND. (The EDIT command, introduced in Section 3.4, uses the same display format.)
As you see, records are numbered, just as the 3x5 cards in the example were numbered.
Under the record number, you find the field names listed in the order they were created. Each field name is followed by an editing window. The width of the editing window is the width of the field.
As always, the underline indicates the cursor position. Now type in the data. You jump from one field to the next by pressing Here is how the screen looks after the first record is entered:
Now pressing If only one could type without making a mistake, there would be no more to appending a record. In Section 1.2, you have already learned how to correct errors in an editing
window. The same keyboard keys direct your input when you APPEND a record: There are three other useful keystrokes: (These editing keys are also available for command line editing and CREATE.) In Ctrl-Y, remember Y as in "yank". Finally, two other keys make it easy to move out of APPEND into EDIT, and vice versa. ("Edit" is a command that allows you to use full-screen editing on existing records.) All the records of a data file can be listed on the screen or on the printer, preceded by their record numbers; all the fields are listed in as many lines as needed. If the contents of a record
are too long to fit on your screen, the lines are wrapped. If you add the command or press Ctrl-P before the LIST command, the records are sent to the printer. However, to be honest, it is very rare that you would send raw data to a printer. If it's worth printing, like an Income
Statement or a Tax Return for example, you would more likely create a program that presents your data in a more useful manner! You may also diplay the records more actively in BROWSE, which shows as many fields as it can fit on one line, with one record displayed per line. Moreover, all the fields in all the records can be changed
just as in edit; even the basic control characters are the same (although some look different because fields are displayed left to right, and records top to bottom). Here's what BROWSE would display for this same file: When a data file is in use, SharkBase is always positioned at a file record. You can visualize this as follows: When you issue the command: "1>USE employee" this opens
the filing cabinet containing the 3x5 cards of employee records. The filing cabinet is always open at a record (a "3x5 card"). At the start, it is open at the first card. Later it is open at other cards, as specified
by the commands discussed here. Where are you: The commands ? and DISPLAY, and the # and RECNO( functions, will tell you. For example, how do you find out at which card the filing cabinet is open? The record number of the current record (that is, the record you are looking at) is given by the function "#". (More about functions in Tutorial
7 and Use the EMPLOYEE file, ask for the record number; it is 1. You SKIP, and check that you are at record 2. GO BOTTOM, check the record number, it is 6. Then SKIP -20; this is too much. No trouble, you arrive at record "zero", which
is just past the top of the file, and no further. Programmer's use record number zero as a way to tell that they have moved past the top of the file; checking for record number equals zero is a way of checking that the position is at
the beginning of the file. Now SKIP 40 (far too much). SharkBase stops at the last record, and an internal flag called end-of-file is turned on. If the data in a record is incorrect (or needs updating), use the EDIT command. EDIT 5 edits the fifth record. If you just type EDIT, SharkBase edits the current record.
Page 42 Conversational SharkBase
EDIT and APPEND display the record in the same form.
Review in Section 2.3 the editing keys for APPEND; they are the same for EDIT. In fact, EDIT and APPEND are merely two modes of the same command; use Ctrl- Delete flag. Every record has a character called the delete flag. When the record is created, this character is blank. Ctrl-U changes the blank to "*", and marks the record as DELETED. In EDIT and APPEND, this * symbol is displayed
on the top line. If the delete flag is *, Ctrl-U changes it to blank; that is, if a record is deleted, Ctrl-U "undeletes" it. The DELETED display at the top disappears. Ctrl-U is another toggle switch. Remember U as in Undo.
It is important to understand that DELETED records are not physically removed from the data file. (Use the command PACK to do that.)
Exit editing. There are two ways to leave EDIT. With "End " and with Ctrl-Q. The changes to all but the currently displayed record have all been recorded. "End" exits and records the changes
to the current record, while Ctrl-Q disregards the changes made to the current record. Remember Q as in "Quit".
Adding records. EDIT and BROWSE both allow you to add new records to the file by pressing Ctrl-PgDn, and to get back out of this adding or "APPEND" mode by pressing "PgUp"
In addition, you can go directly into append mode in EDIT by entering APPEND at the command line instead of EDIT.
Editing memo fields. Memo fields contain variable-length data up to thousands of characters long, while requiring only 10 characters in the data file itself. This is done by putting the memo
into a companion file with a DBT extension. Whenever the cursor is on a memo field in EDIT, APPEND, BROWSE or READ, pressing Alt-W will give you a screen to enter your memo into using the standard SharkBase WRITE command; pressing You have just noticed that there is a mistake in Poyner's record. He was hired in 1992, not 1991. Of course, you can EDIT 5, go down with the cursor 9 fields, and type "1992", then This command is most useful if you want to change the telephone numbers for several records; for instance: This erases the next 10 telephone numbers. If the records are longer than the screen width, LIST may not be too efficient to use. Why not LIST only those fields you need: The command LIST can be followed by a list of those fields (such lists are called field lists) you wish to see, as in the example. (The longer form of the command: LIST FIELDS name, tel : no is also accepted by SharkBase.) If you want
to see only the current record, use DISPLAY. For example: Similarly, BROWSE can also be restricted to a selected group of fields: displays the screen: Since there is only room for some of the fields on a single screen, BROWSE allows users to scroll the screen left and right with the same keys used in CREATE and MODIFY to jump from column to column of the structure fields, and in
EDIT and APPEND to jump from page to page of a single record. Ctrl-L jumps one screenful of fields to the right, and Ctrl-K jumps one screenful of fields to the left. With the cursor on record 1 in the Page 1 screen above, SharkBase
displays the following screen, called Page 2: (BROWSE cannot display any fields wider than 72 characters wide.) Such applications of LIST and BROWSE may be the fastest way to correct mistakes and update
Remember the commas separating the field names. To be safe, always end a SharkBase session with the command QUIT. If you turn the computer off while it's writing data to storage, some files may be damaged. This is unlikely with today's fast emulators,
but regardless, one should be aware of the possibilty.
1.5. Correcting: Entries
"<" move the cursor back one character
">" move the cursor forward one character
"Backspace" delete the character to the left of the cursor.
"Del" delete the character on the cursor
 "Ins" get into insert mode: what you type gets inserted (normally, you are in overtype mode: what you type overtypes the existing text); pressing  "Ins" again, puts you back into overtype mode
"Backspace" delete the character to the left of the cursor.
"Del" delete the character on the cursor
"Enter" jump the cursor to the beginning of the next editing window
"^" move the cursor to the previous editing window
"v" move the cursor to the next editing window
 "PgDn" move the cursor to the first editing window of the next record
"Ctrl-K" move the cursor to the previous screen (if there are than 16 fields)
"Ctrl-L" move the cursor to the next screen (if there are than 16 fields)
 "End"  complete  the APPEND procedure
"Ctrl-Y"  erase the editing window to the right of the cursor (fill it with blanks)
"Ctrl-< "      move the cursor to the beginning of the editing window                                                                                                                                                                                                                                                                                                                                                                                                                                                                                                                                                                                                                                                                                                                                                                                                                                                                                                                                                                                                                                                                                                                                                                                                                                                             "
"Ctrl-> "      move the cursor to the end of the editing window
 "PgUp" when in APPEND, will leave APPEND and enter EDIT with the previous record; when in EDIT, just go to previous record
"Ctrl+PgDn" when in EDIT, create a new record and enter APPEND mode
1.6. Viewing All Records (or "File Cards"): The Commands "LIST" and "BROWSE"
1>
1>USE employee
1>LIST
1 Marek Joe 231 River Drive Broomsdale  MA
02110 566-7012  T 25800.00 1991 Maintenance
2 Balzer Joan 2407 E 38th Street Broomsdale  MA
02111 566-1212 F 11743.00 1989 Reception
3 Steiner Tom 114 North Pitt St.  Lakewood MA
02111 596-0017 T 35780.00 1994 Engineering
4 Raymer Pamela  42368 Wedgewood Dr. Broomsdale   MA
02110 566-1789 F 79110.00 1985 President
5 Poyner Roger 2757 Regency Road Florington   MA
02113 403-1193 T 8710.00 1991  Maintenance
6 Wilson Robert 16255 Ventura Street Broomsdale  MA
02110 566-7701 T 33870.00 1993 Engineering
1>
1>SET PRINT ON
#1 EMPLOYEE.DBF                                SharkBase BROWSE
                                                                                                                                                                     Page 1
REC: Prev/PgUp Next PgDn                      SCROLL: Left/^K Right/^L              SCREEN: Up/@E Down/@X
FILE: Top/^Home Bottom ^End                    MEMO EDIT: @W                        DELETE: To EOL/^Y Record/"U
APPEND MODE: Begin/^PgDn                   Exit/PgUp                                    EXIT: With save/End No save/^Q

NAME        FNAME   ADDR                           CITY               STATE
1 Marek    Joe        231 River Drive             Broomsdale   MA
2 Balzer   Joan      2407 E 38th Street        Broomsdale   MA
3 Steiner  Tom      114 North Pitt St.          Lakewood       MA
4 Raymer Pamela  42368 Wedgewwod Dr.   Broomsdale   MA
5 Poyner  Roger    2757 Regency Road       Florington     MA
6 Wilson  Robert   16255 Ventura Street    Broomsdale    MA
1.7. Looking at the Record
1.8. Moving Around the File with the GO and SKIP commands:
GO: GO 3 goes to the third record and opens it.. You can also type GOTO instead of GO. In fact, as in dBase, "GO 3" and "GOTO 3" do the same. This tutorial uses the "GO 3" form. The first record in the data file is TOP, the last one, BOTTOM.
So you can go to the first record with GO TOP, and to the last one with GO BOTTOM.
SKIP: SKIP means skip to the next record. SKIP 3 goes ahead 3 records; SKIP -4 goes back 4 records. Use GO, SKIP, and ? # for the EMPLOYEE file:
1>USE employee
1>? #
1.00
1>SKIP
1>? #
2.00
1>G0 BOTTOM
1>? #
6.00
1>SKIP -20
1>? #
0.00
1>G0 BOTTOM
1>? #
6.00
1>SKIP -20
1>? #
0.00
1>GO TOP
1>? #
1.00
1>SKIP 40
1>? #
6.00
1.9. Edit the Records:
1.10. Quick Edit: The Command REPLACE
1>G0 5
1>REPLACE year:emp WITH '1992'
1 REPLACEMENT(S)
1>
1>REPLACE NEXT 10 tel:no WITH ' '
Selective LIST, DISPLAY, and BROWSE
1>USE employee
1>LIST name, tel:no 1 Marek 566-7012 2 Balzer 566-1212 3 Steiner 586-0017 4 Rayme 566-1789 5 Poyner 403-1193 6 Wilson 566-7701
1>USE employee
1>DISPLAY name, tel:no
1 Marek 566-7012
1>
1>USE employee
1>BROWSE name, tel:no

